
Hub Technology
This particular internal system assures 3 pawls engage while the other series of 3 pawls wait to engage. Drag has been reduced with fewer en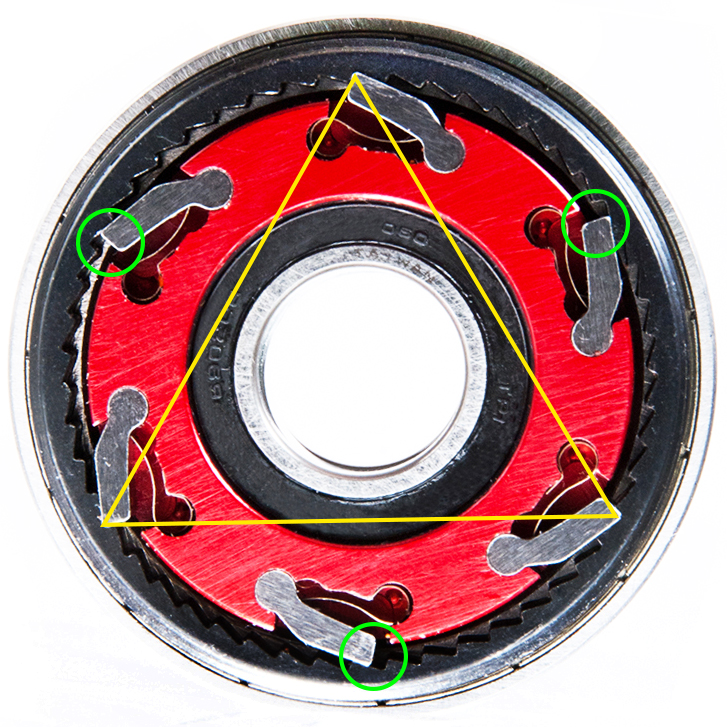 gagement points. Pawl life expectancy is also increased.
- 6 Pawls
- 51 Tooth Engagement Ring
- 102 Engagement Points
- 3.53 Degrees of Engagement
Our goal was never to have all 6 pawls engage in unison of which; is mathematically impossible. It was to reduce drag all while offering a fast engagement.
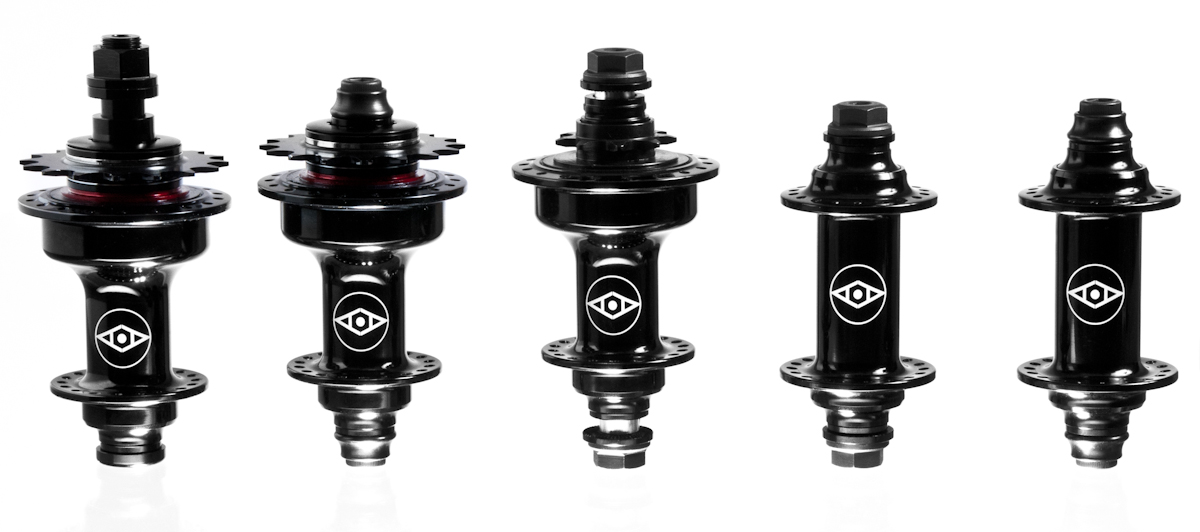
The Thrust hub utilizes a massive thrust bearing that permits rotation between the shell & the cog carrier/driver while supporting axial load, which makes for a dreamy smooth rotation. For the most part the entire series of Thrust hubs can be disassembled mostly without tools, allowing for easy access to maintain the hub(s). Guards press-on. Oversized bearings throughout.
Available in:
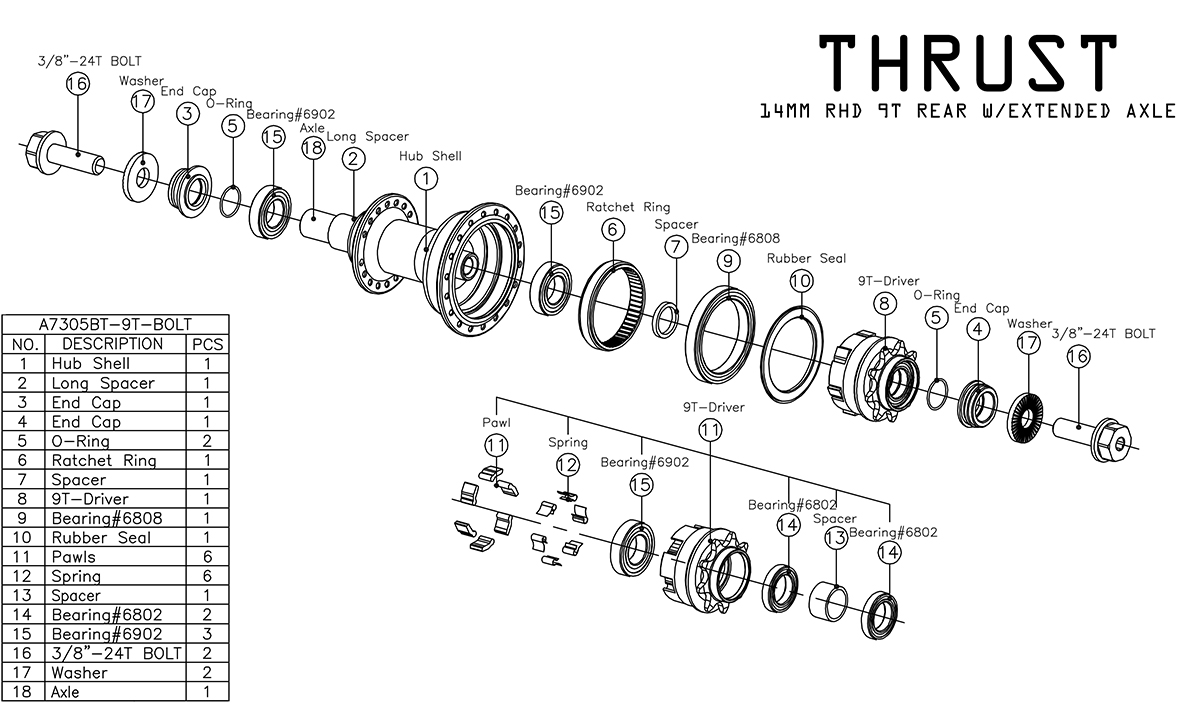
14 mm RHD 9t rear w/extended axle
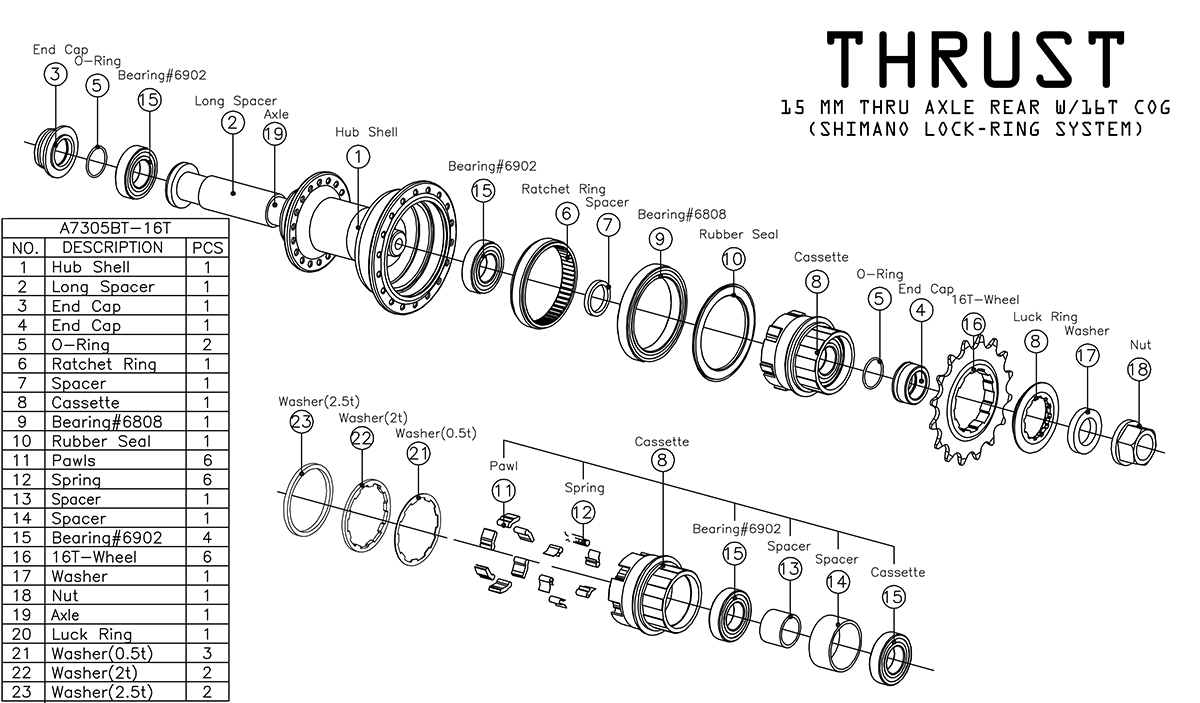
15 mm thru axle rear w/16t cog (Shimano lock-ring system)
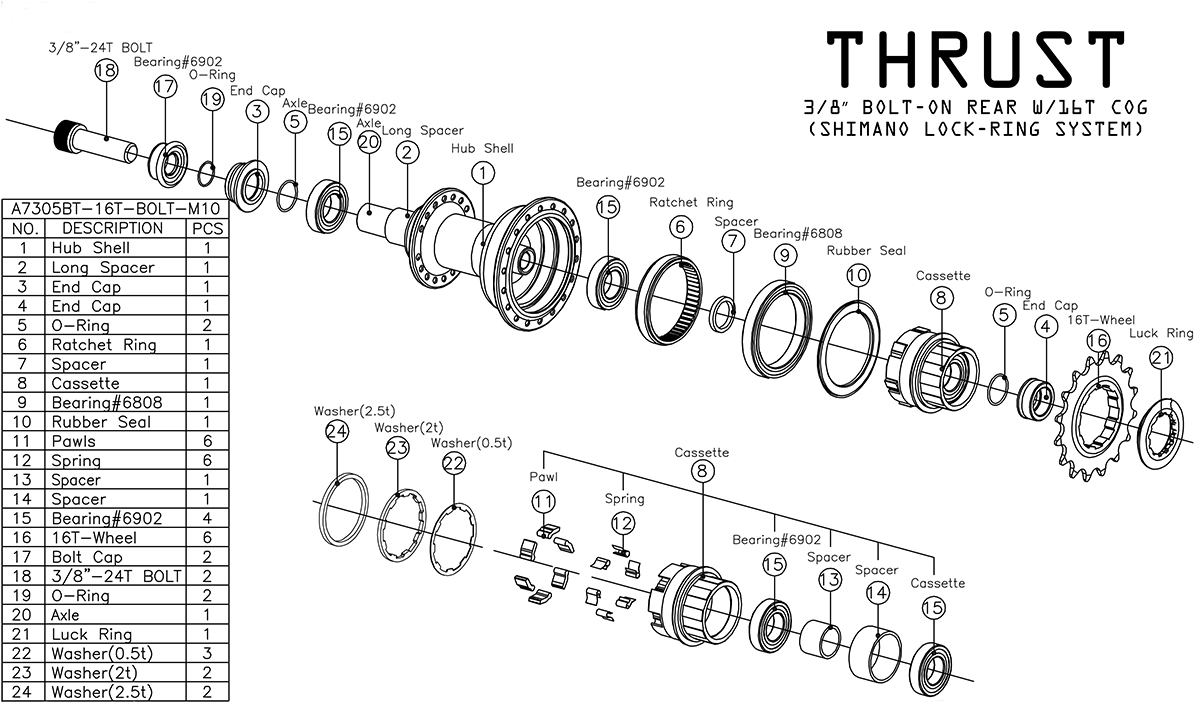
3/8? bolt-on rear w/16t cog (Shimano lock-ring system)
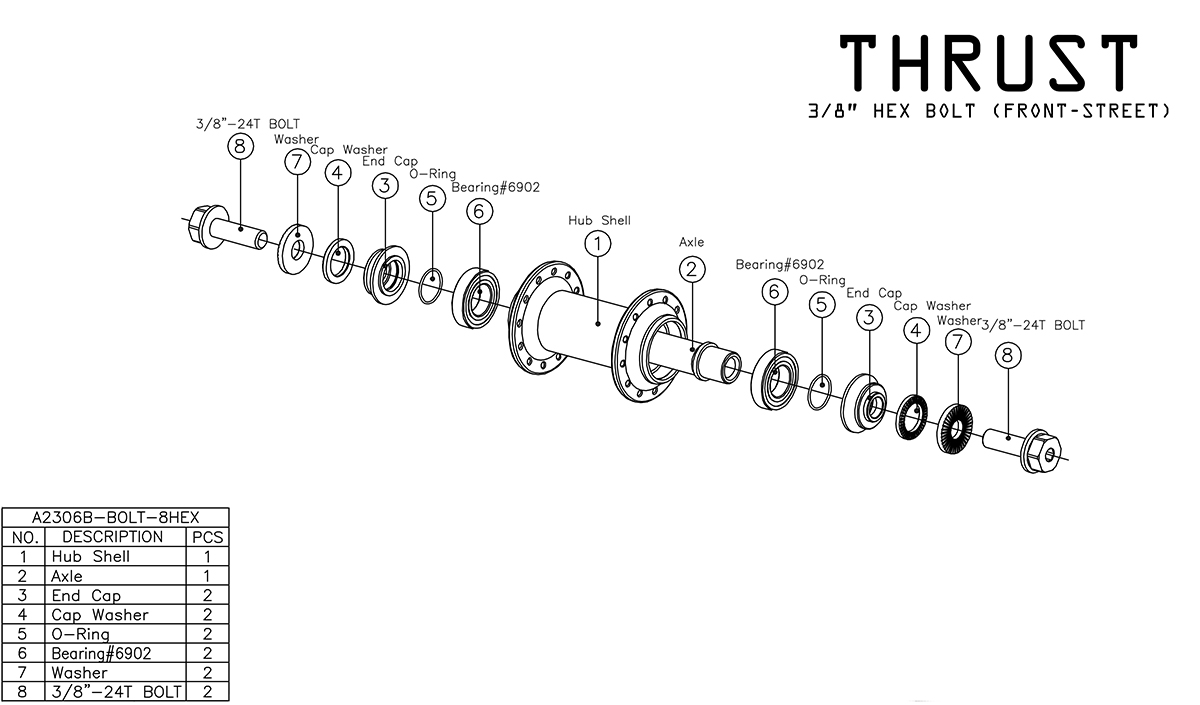
3/8? bolt-on front
Press-on Hub Guards for easy install available for front and rear Thrust Hub(s)

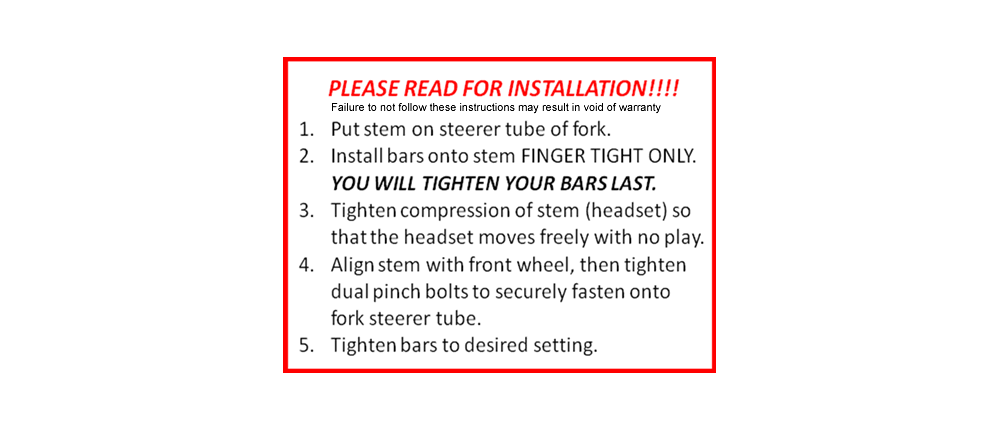
1. Before you start
GENERAL WARNING:
All Alienation products should be installed and serviced by a qualified bicycle mechanic using appropriate professional tools. ALIENATION assumes no liability for products which are improperly installed, removed, assembled, disassembled or configured. Improper installation, adjustment or service may result in damage to the component or component failure.
Use only genuine ALIENATION replacement parts.
After any installation, adjustment or repair, test your work by taking a test ride in a controlled environment, away from cars, other cyclists, obstacles or other hazards.
Failure to follow these instructions can result in component failure. Component failure can cause the rider to lose control of the bicycle and fall, leading to serious injury or death.
(a) Identify your hub. The graphics on the hub shell should say ALIENATION. If they do not, find the Maintenance, Service and Repair instructions for your ALIENATION hub model on this web site, at alienationbmx.com/technology.
(b) Make sure you have read the ALIENATION Hub Instructions which are packed with the hubs and are also available on this web site at alienationbmx.com/technology.
(c) Download, read and follow these Maintenance, Service and Repair instructions.
2. Tools and Equipment
To disassemble and reassemble your hubs, you will need the following tools:
two 19mm cone wrenches
a rubber mallet
a pair of pliers
grease (preferably waterproof type)
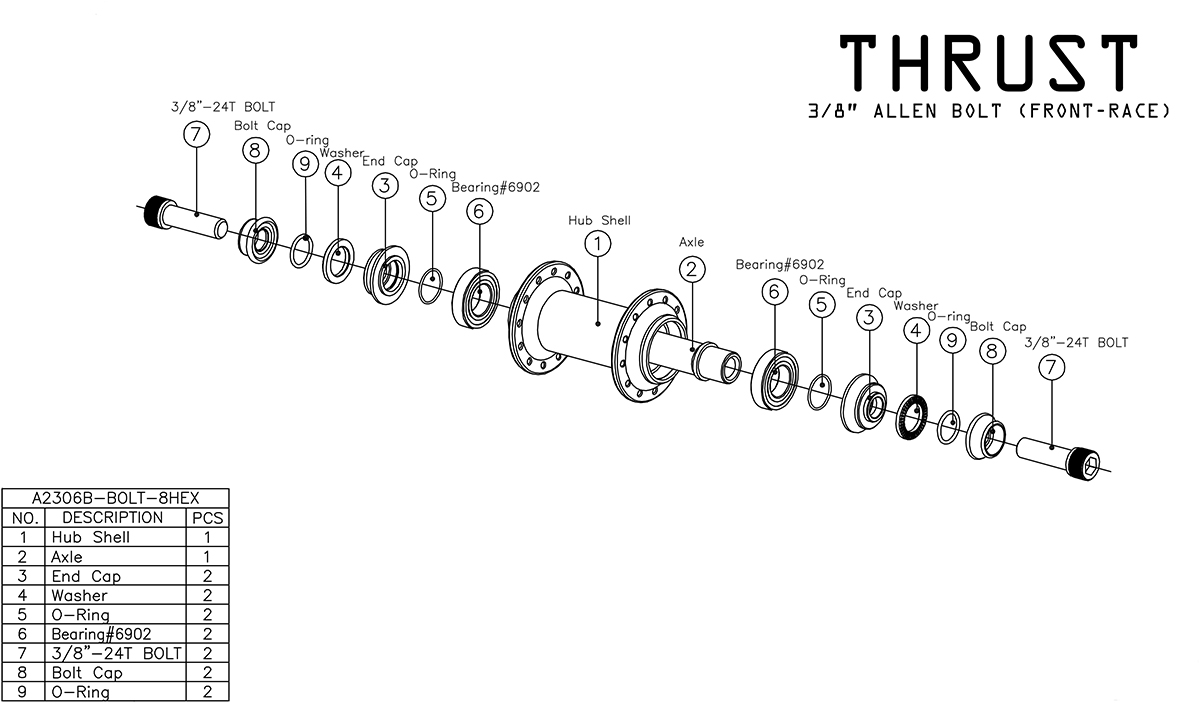
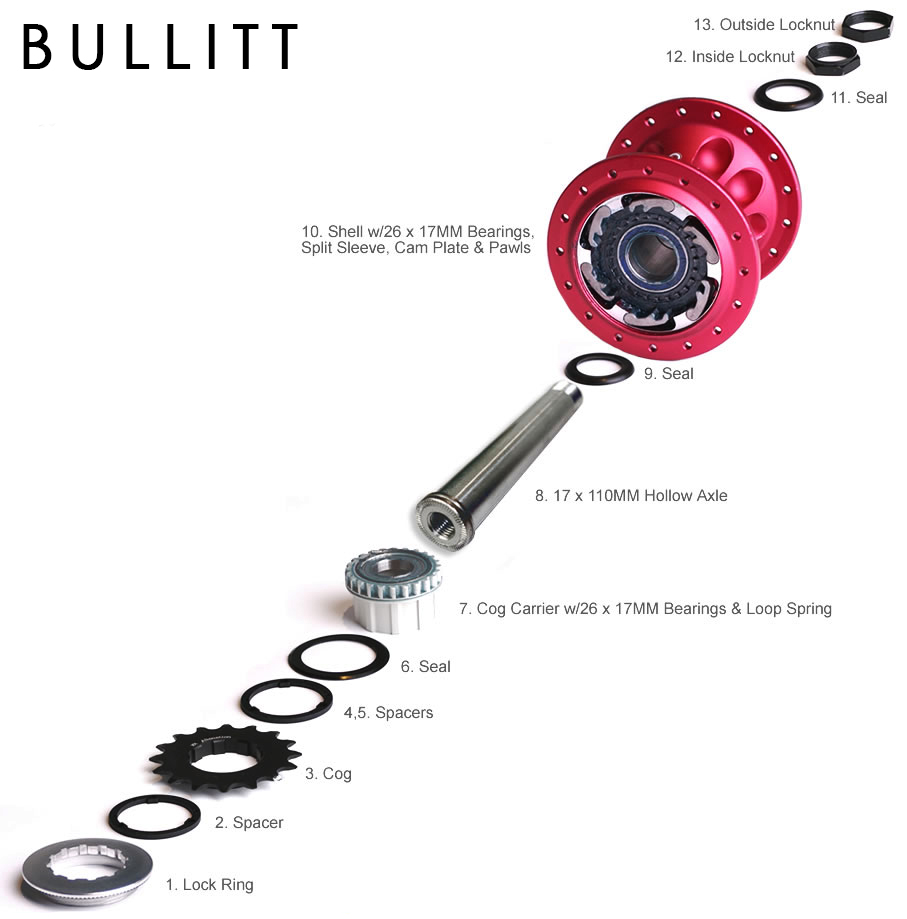
3. Serviceable Parts

4. Disassembling the existing hubs
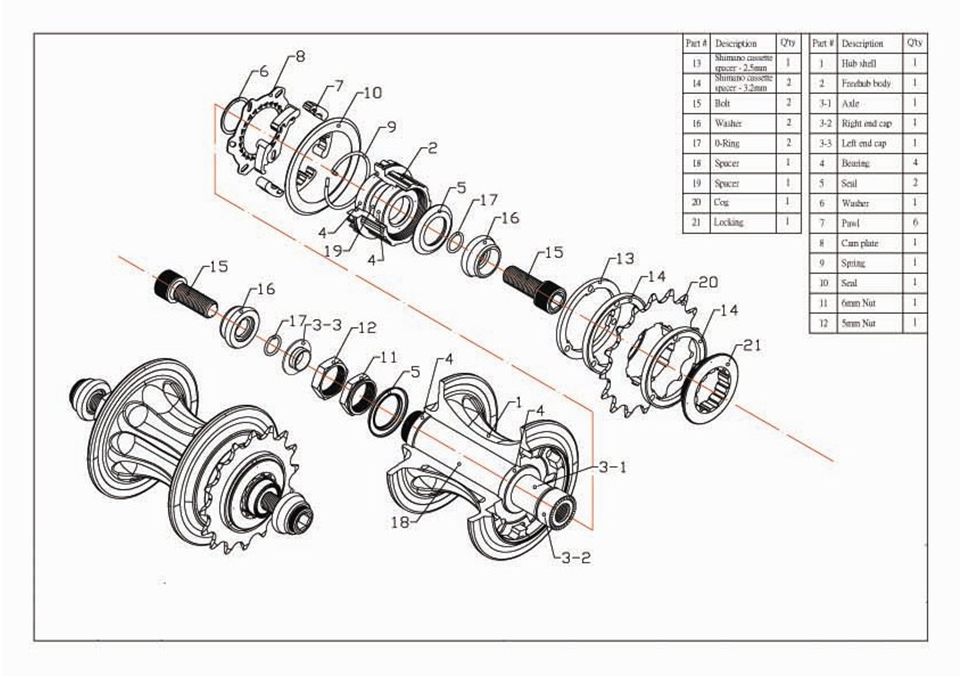
For the front hub with bolts removed, grasp the drive side of the Axle (3-2) with a pair of pliers. Much like a conventional hub, on the non-drive side there is a Lock Nut (6) and an Adjuster Nut (5), which runs against the Bearing (2). With two 19mm cone wrenches you will be able to loosen the Lock Nut and Adjuster Nut threading them off the axle. From the drive-side pull the axle assembly completely out of the hub. When re-assembling the hub, pay special attention to reinstall the rubber Dust Seals (4).
For the rear hub with bolts removed, grasp the drive side of the Axle (3-2) with a pair of pliers. Much like a conventional hub, on the non-drive side there is a Lock Nut (12) and an Adjuster Nut (11), which runs against the Bearing (4). With two 19mm cone wrenches you will be able to loosen the Lock Nut and Adjuster Nut threading them off the axle. From the drive-side pull the axle assembly completely out of the hub leaving the Dust Seal (5) in place behind the Locking (21).
Now, the Hub Shell (1) and Freehub Body (2) can be removed from the Axle. They are separate pieces, held together by the Axle, so you will be able to separate them. Pieces shouldn’t go flying as they are separated, though be careful to not drop any of the Pawls (7) or the axle Washer (6), which may be loose. When re-assembling the hub, pay special attention to the rubber Dust Seal (5) placement on the built-in Adjuster Nut End Cap (3-2).
5. Replacing the front hub and rear hub with enhanced axles
On the rear hubs, lightly grease the axle assembly prior to installation. With the Freehub Body (2) installed correctly insert the Enhanced Axle with a red end cap (3-2) through the drive-side. If needed; lightly tap the Axle (3-2) with a rubber mallet until seated firmly against the Bearing (4). Reinstall the non-drive side Dust Seal (5). Thread the Adjuster Nut (11) on follow by the Lock Nut (12). Hand tighten both Nuts. Hand press End Cap (3-3) into recessed end of Axle (3-1). Once firmly in place tap lightly with rubber mallet into position. Once wheel is installed into frame adjust bearing load as per line item #6.
On the front hubs, lightly grease the axle assembly prior to installation. Insert the Enhanced Axle with a red end cap (3-2) through the drive-side along with Dust Seal (4). If needed; lightly tap the Axle (3-2) with a rubber mallet until seated firmly against the Bearing (2). Reinstall the non-drive side Dust Seal (4). Thread the Adjuster Nut (5) on follow by the Lock Nut (6). Hand tighten both Nuts. Hand press End Cap (3-3) into recessed end of Axle (3-1). Once firmly in place tap lightly with rubber mallet into position. Once wheel is installed into fork adjust bearing load as per line item #6.
6. Adjusting the bearings
When the wheel is secured in the frame or fork is the time to adjust the bearing play. While holding the Adjuster Nut with a 19mm cone wrench, loosen the Lock Nut with a second 19mm cone wrench. Turn the Adjuster Nut clockwise to eliminate play. Tighten the Lock Nut back down against the Adjuster Nut. Take care though to adjust the hub so that there is just enough load on the bearing to remove play. Over-tightening will cause the bearing to overload, and they can wear out prematurely.
7. Contact Information
If you have any questions or problems with any ALIENATION product, please go to alienationbmx.com for help.
8. Disclaimer
The original English language version/meaning of these instructions supercedes all translations. ALIENATION is not responsible for any errors in translation of these or any product instructions.
© Copyright ALIENATION May 2013


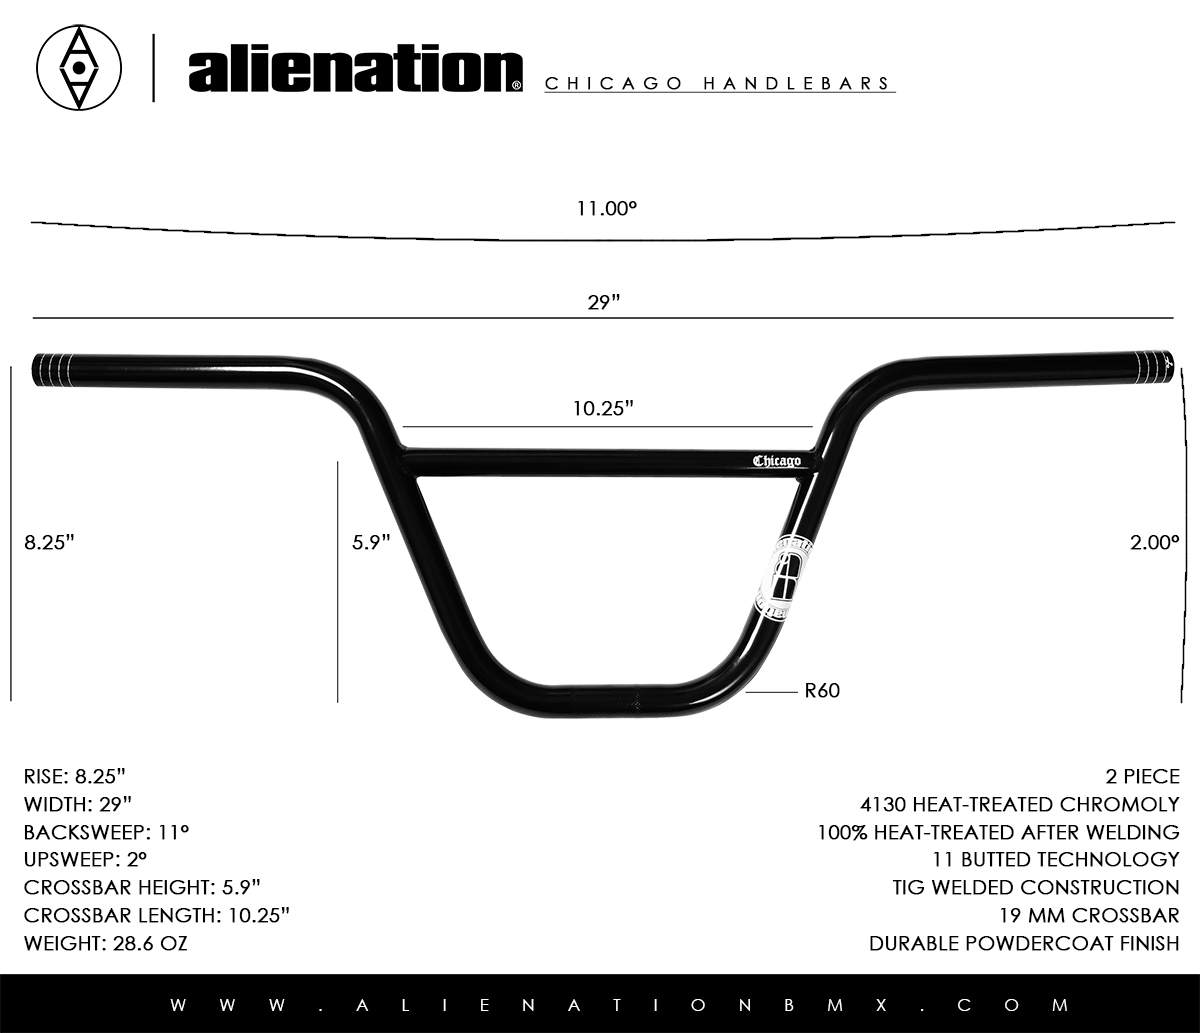
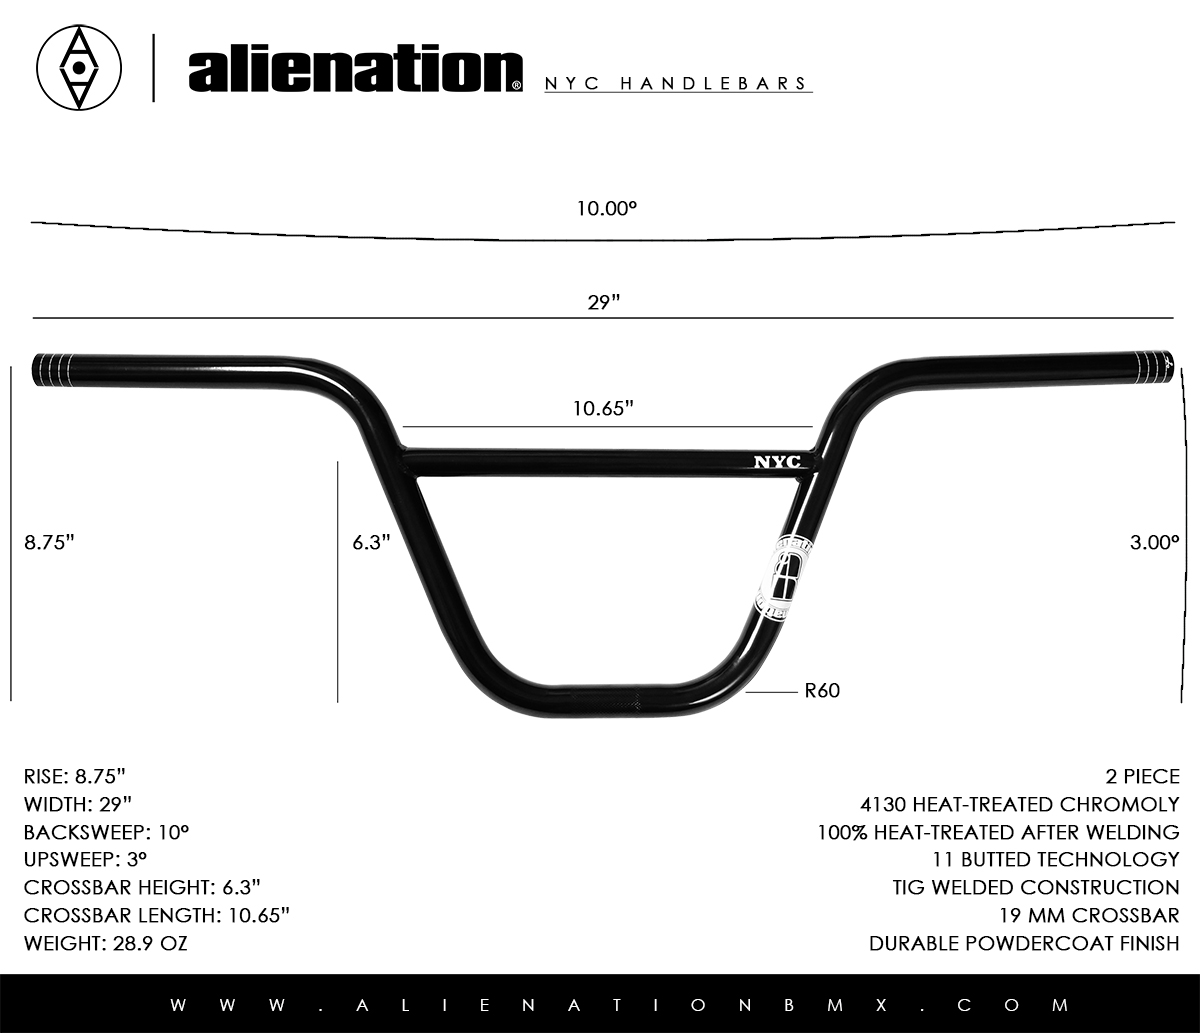
Handlebar Technology
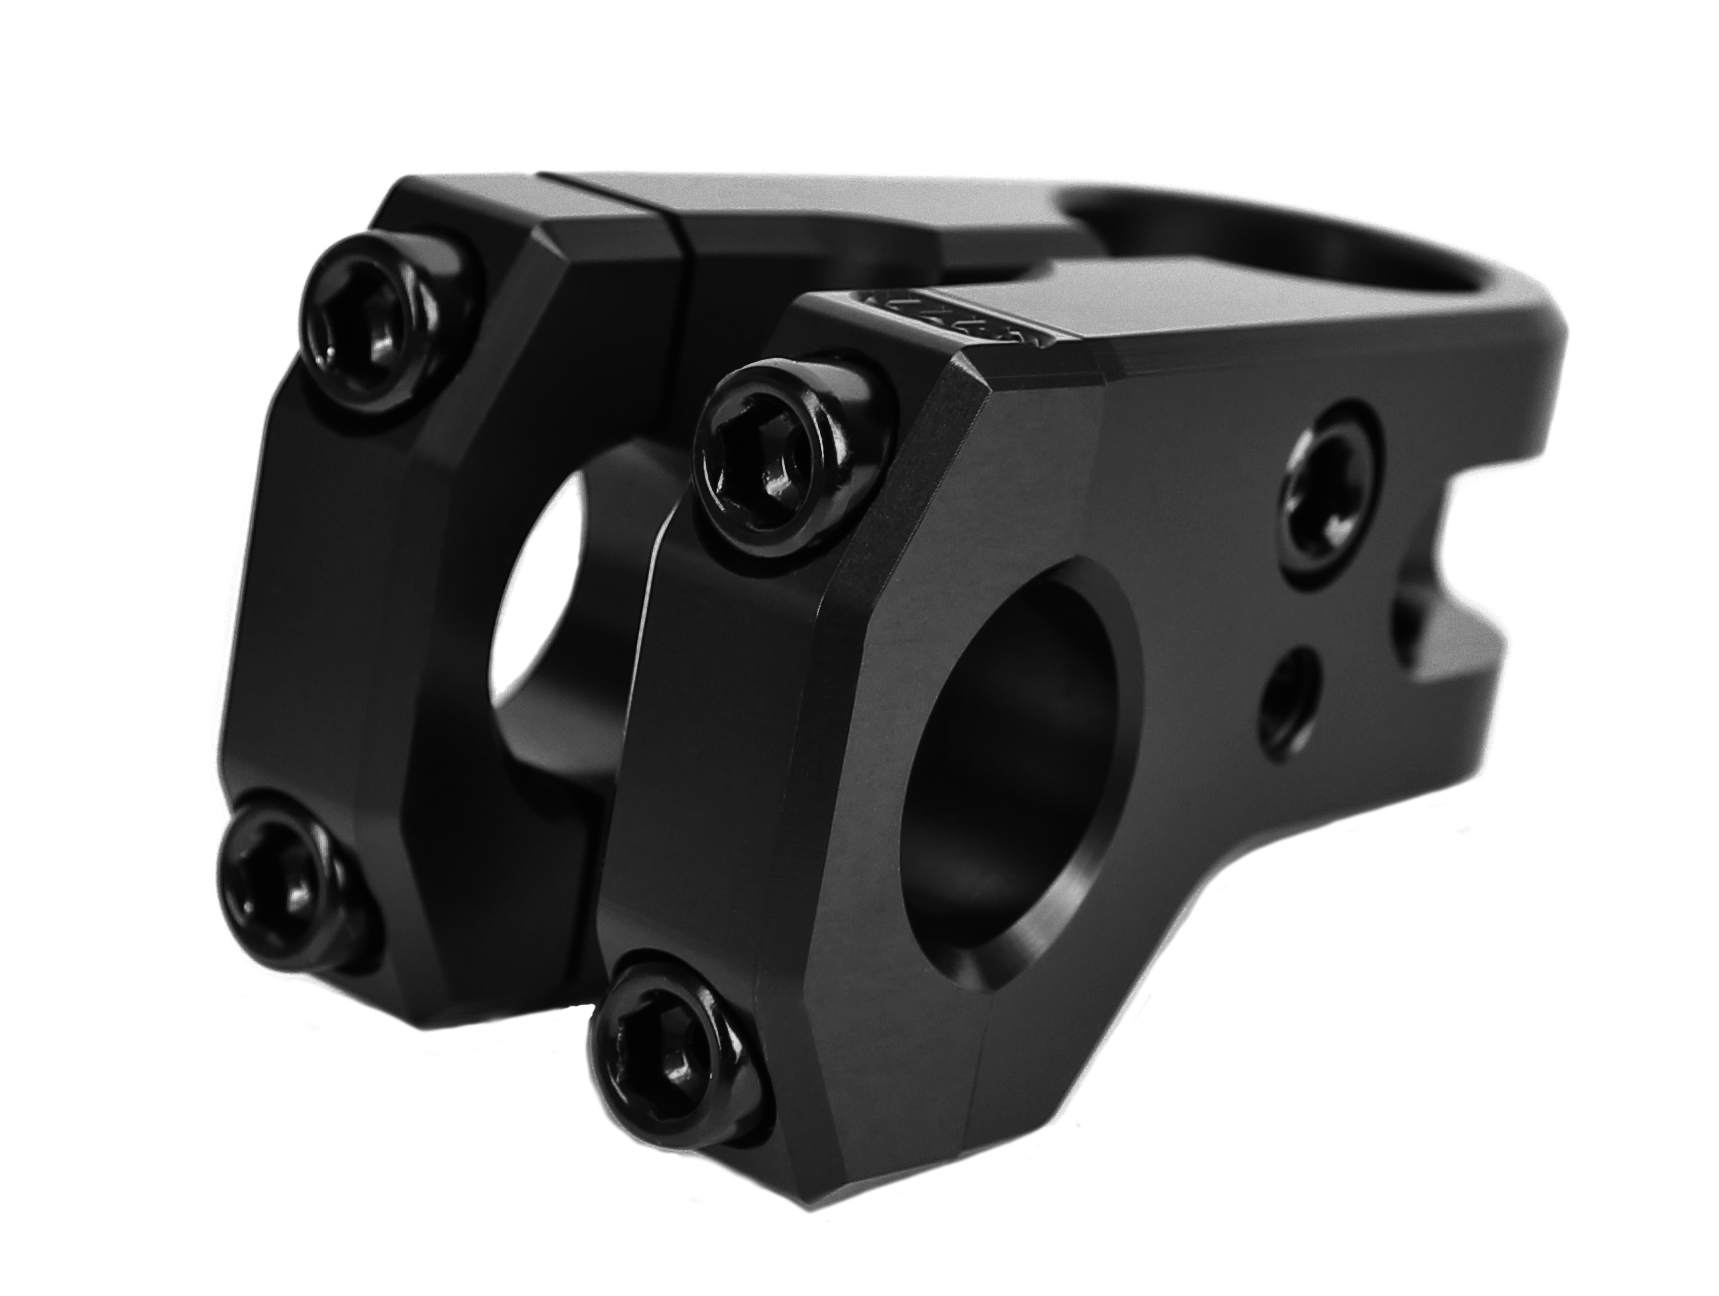
Stem Technology
Grip Technology
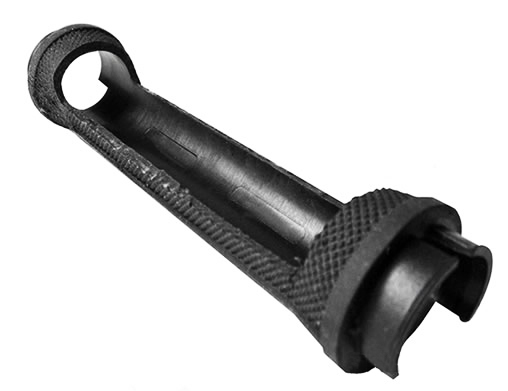
For those of you that haven’t considered running lock-ons because of the flex in the tube or the way they feel think again.
Our concept uses a window where the tube has a cut out. What does this all mean? You feel bar not a plastic tube plus the kraton grabs the bar per the open area so it does NOT throttle. The feel is thin & sticky. In addition we are using a 1 pc bar end so it’s clean, simple and safe.